Page 1 of 2
strut insert installation
Posted: Fri May 17, 2024 6:16 am
by mark
I am looking for instructions on how to install strut inserts for my 300E. I ordered these inserts several years ago and delayed installing them long enough. Most curious is whether or not anything is needed to cushion the strut at the bottom or the top. And should I fill with oil.
In addition to the struts, I think I understand rebuilding the TCA ball joints, but instructions for this may help me too.
Yes I know...I could do a search, but perhaps someone here could save me from sitting in front of this computer!
thanks all
Re: strut insert installation
Posted: Sat May 18, 2024 5:21 am
by mark
I found some info on the TCA's ....
https://www.ford100e.org/t14928-track-c ... rms-handed
now I would like to see if anyone has posted how they installed the struts inserts, or have any suggestions of things to watch out for.
thanks everyone
Re: strut insert installation
Posted: Mon May 20, 2024 9:22 pm
by peteleo
Sealed inserts won't require shock oil. If you have inserts without the outer
casing then add 50cc 20w shock oil into the strut tube. Once the insert is in the strut
tube screw down the gland nut ( make sure the threads are clean and undamaged )
Gland nut should be near flush with the strut tube after tightening. You may have to insert
a spacer to the bottom of the strut tube to raise the insert so the gland nut will secure the insert tight within the strut tube .
Re: strut insert installation
Posted: Tue May 21, 2024 5:17 am
by mark
Sounds straight forward as I expected. I have heard where oil is added in the old housing to dissipate the heat from the strut insert, but was not sure if I needed to do this. Car is not driven in a performance manner, so I will leave the oil off as suggested.
"A spacer at the bottom if needed" ....exactly what I was hoping to hear.
I got the strut inserts and TCA ball joints from England several years ago. All other suspension parts were replaced back then. Now after about 5K miles on old leaky struts and worn ball joints, I figure I had better take care of these. Been driving on borrowed time long enough!
I do have one more question if anyone can answer... I understand the front coils have a top and bottom...how do you tell which way to insert it?
I am sure I did not know this when it was assembled. Want to get this right this time!
Re: strut insert installation
Posted: Tue May 21, 2024 11:26 am
by Brett Wilkie
"I do have one more question if anyone can answer... I understand the front coils have a top and bottom...how do you tell which way to insert it?
I am sure I did not know this when it was assembled. Want to get this right this time!"
If you clean the spring up well you will find one or two notches on the spring end, the notched end is the lower end of the spring. The springs are rated according to the notches, the two notch spring has a heavier rating.
Re: strut insert installation
Posted: Wed May 22, 2024 4:44 am
by mark
Thanks Brett, I always wondered why would it make any difference. Could it be for a proper fit? or did the engineers really figure in some complex spring vibration analysis?
Re: strut insert installation
Posted: Wed May 22, 2024 10:33 am
by Brett Wilkie
Good question? I was reading that right out of the shop manual.
Re: strut insert installation
Posted: Mon May 27, 2024 7:11 am
by JAN
"If you clean the spring up well you will find one or two notches on the spring end, the notched end is the lower end of the spring. The springs are rated according to the notches, the two notch spring has a heavier rating."
I suspect that fitting the springs with the notch(es) at the bottom is simply to ensure that these can be seen and so the spring rate verified. I don't think that the orientation alters the spring's performance.
Re: strut insert installation
Posted: Mon May 27, 2024 12:27 pm
by Brett Wilkie
Thanks Jan, I suspected that might be the case as the ends do look the same in my eyes.
Re: strut insert installation
Posted: Thu Sep 26, 2024 7:06 pm
by mark
Hi all, I am finally rebuilding my ball joints and doing the strut inserts. I would love to post some pics of this to help others in the states that are considering this as well as to get feedback on some issues by showing pics. However, I am having problems inserting an image. All the selection boxes (above this text box) are blank but when I hover over them, it displays the command. so when I click on insert image... here is what appears in this text box:
img /img
I think I tried to resolve this long ago and never succeeded. any ideas ?
Re: strut insert installation
Posted: Sun Sep 29, 2024 8:08 am
by mark
I found the attachment tab below I will try post pics this way. Seems like it might be painful...I have to get the pics down in size first.
First, the springs. I found the 2 indentions:

- 2 notch.jpg (146.14 KiB) Viewed 18380 times
I wanted to see what my other spare springs have:
notice the first spring has 1 indention, the second has two, and the 3rd has 2, but looks more like a "notch" than indention and spaced closer together. Must have been a change in the production run?. I am glad at least I have been using the 2 notch springs. I will be placing the notch side down.
Re: strut insert installation
Posted: Sun Sep 29, 2024 8:24 am
by mark
For the struts,
The struts inserts look super easy to do. Remove all internal parts, install the supplied parts.
here is a photo of the supplied top ring started on by a few threads over the insert...
And for those wondering what strut insert to use, I did look around extensively for a part number in the states with no success prior to purchasing from a supplier in England. Now that we have a part number, perhaps there is a cross reference in the states?
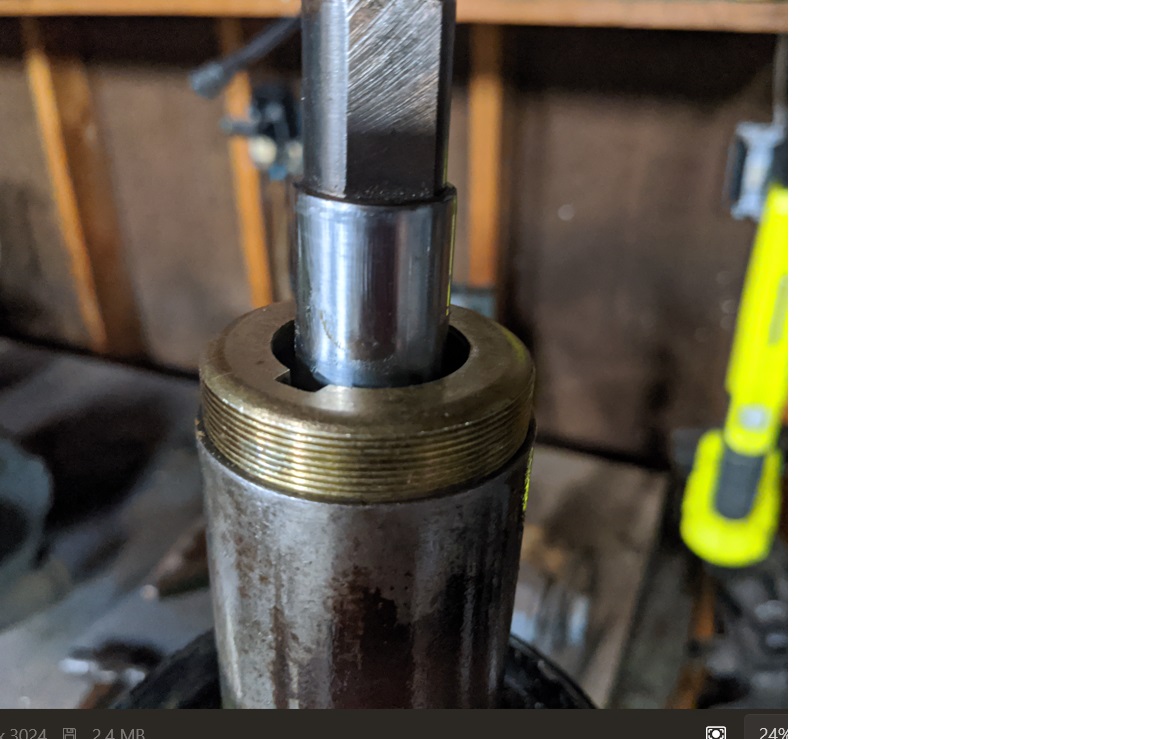
- strut.jpg (137.94 KiB) Viewed 18379 times

- armstrong.jpg (145.56 KiB) Viewed 18379 times
Re: strut insert installation
Posted: Sun Sep 29, 2024 9:12 am
by mark
Regarding the TCA ball joint rebuild....
I welded a rod to the cap and used it like a dent puller. The cap pops off like butter.
I am inspecting the ball joint rebuild components and I don't really like what I see. Heavy machining marks in the ball and the spring cups.
These two parts are hardened and I polished them somewhat with 600 grit paper which will do nothing for the machining marks.
(More to come...seems i can only get 3 pics in a post)
Re: strut insert installation
Posted: Sun Sep 29, 2024 9:44 am
by mark
The small cup is stamped steel and is soft. I put it on the ball and inserted into the TCA, pressed on it with my hand to simulate a spring and the ball stud was hard to move...it was hanging up or binding on the small cup. So I inspected the small cup closely and found raised edges on the inside and outside surfaces caused by the stamping process. The outside edge was binding in the TCA arm while the inside edge was binding against the ball. I carefully remove both edges by slightly beveling them.

- small cup bevels.jpg (119.46 KiB) Viewed 18376 times
Next, I assembled the small cup, ball stud, and spring cup into the TCA arm; applied hand pressure and moved the stud around and spun it by hand so I can see where the parts are touching. You can see a contact line around the outside and spotty contact marks close the inside edge.

- wear marks.jpg (116.94 KiB) Viewed 18376 times
I thought these parts would have had better precision, but again maybe it is not needed either. Its not a spinning shaft in a bearing so maybe it will be fine. I do hate to see the "point contact" of metal to metal. If I set the clearance to the minimum of .003", I believe the clearance will only grow in short time as the parts may wear in quickly. These parts may still be better than the old worn out stuff. It is what it is.
Am I overthinking again? anyone else seen what I see? I still plan to go through with it and will continue to post pics as it progresses.
Re: strut insert installation
Posted: Fri Oct 04, 2024 8:02 am
by MidnightMaverick
Sounds like you're gettin' deep into this strut insert project. Dunno much bout it myself, but seems like you're giving it a good go. Pics help too.